How to Build a Sportster
(from a pile of junk)
The full sized version of pictures on this website can be viewed by right clicking on the picture and selecting "VIEW IMAGE", then use your browser back button to return to the web page.
Chapter Three
The full sized version of pictures on this website can be viewed by right clicking on the picture and selecting "VIEW IMAGE", then use your browser back button to return to the web page.
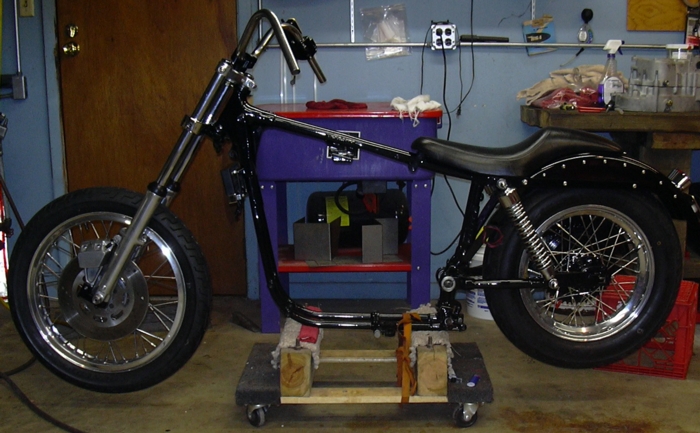
Progress to date, Sunday, February 5, 2006. Fenders, you would think, should be a piece of cake. Drill a couple of holes, a couple of bolts and you are all set. What could be the problem? Well, the rear shocks, for one, are often the problem. I once worked on a bike, the owner of which said, his girlfriend didn't like because her ass was getting hot when she rode on it. How could that be? As it turns out the guy lowered the bike by putting shorter shocks on it, shocks, that, as it turned out, were way too short. When his old lady plopped her very hot butt on the seat, the fender started hitting the tire. The resultant friction heated up her already naturally hot butt even more. And, this ain't no lie, the fender got so hot it discolored the paint and started melting the plastic on the bottom of the seat. While you don't have to be a rocket scientist to work on XLs, it helps to have half a lick of common sense.
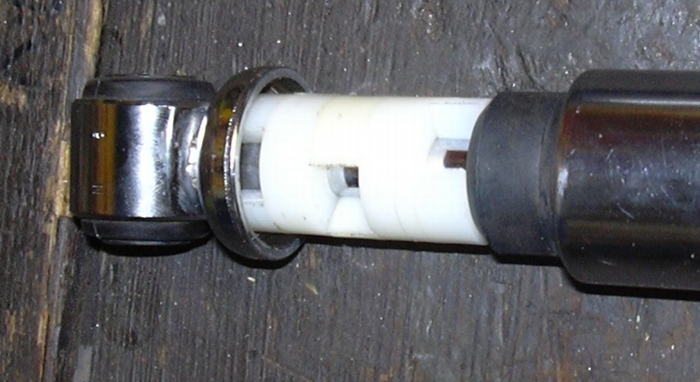
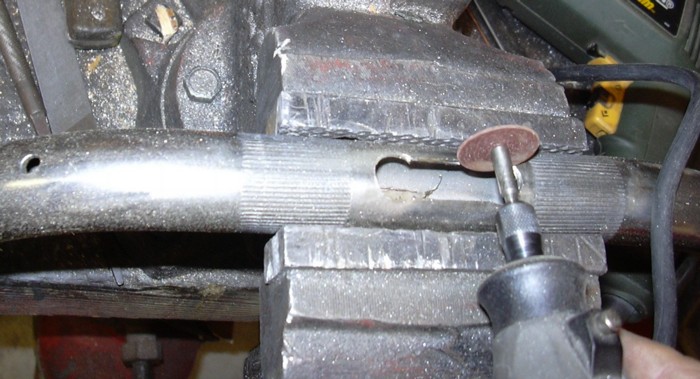
So the first step in fitting a fender is to know for sure how short your shock is going to be when it is compressed all the way. And the only way to know that for sure is to take the spring off and measure the compressed length. As you may recall I bought a set of 13.5" shocks off a late model Evo for this project. The original shocks for this frame were also 13.5" so it should be a simple bolt on with no effect on other parts of the bike? Think again. I took the shock off the bike and took the spring off the shock and compressed the shock, the shock went from 13.5" eye to eye down to 10" eye to eye which makes for 3.5" of travel. I then took a hunk of scrap wood and drilled two holes 10" apart to simulate the length of the compressed shock. Then I attempted to install the piece of wood where the shock used to be. Guess what, with the fender removed I couldn't raise the swing arm far enough to put the piece of wood over the shock mounts. To have fit the fender and left the shocks alone would have damaged the tire and the fender and maybe even the swing arm! The solution ends being having to limit the travel of the shock. I'm pretty sure Progressive sells travel limiters on their website, however, I make my own travel limiters. I went to Lowes and bought hard nylon spacers, the ones I used are 1" diameter by 3/8" thick. I drilled a hole in the middle of the spacer to fit the shock. Then using something called a razor saw I slice a wedge out of the side of the spacer. The wedge is just a little smaller than the diameter of the shock shaft. I can then snap the spacer over the shock shaft thus limiting the shock travel. I can stack up as may as I need to limit the travel to whatever it needs to be. On this particular bike with this particular wheel/tire setup I ended up limiting the shock travel to 1.5", not a hell of a lot. But a hell of a lot more than the rigid I used to drive and not out of line with what HD was doing back in those days (76). I know this because I went through my crate of old shocks, they range from 12.5" to 14" uncompressed and would compress from 1" to 2". So a couple of lessons; the Evo XLs have over twice as much shock travel as some Iron Xls, an immense improvement, and anybody who tells you a 12.5" shock will fit right on your old Ironhead without a problem is probably lying. Below you see the homemade spring compressor, basically a chunk-o-steel plate with a hole in the middle and two threaded rods used to do the compressing. It works great, nice, quick and easy, and, I can't believe I'm saying this, actually safe. Cost about two bucks to make.
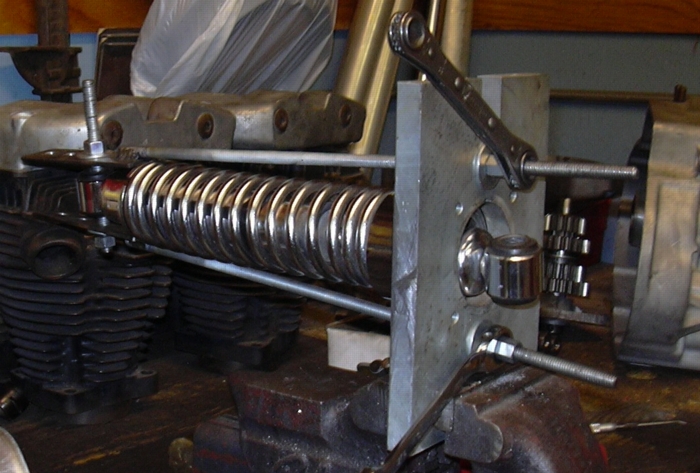
Hand made spring compressor installed...

The Evo shock, spring removed, compressed and measured.
Hand made travel limiters installed.
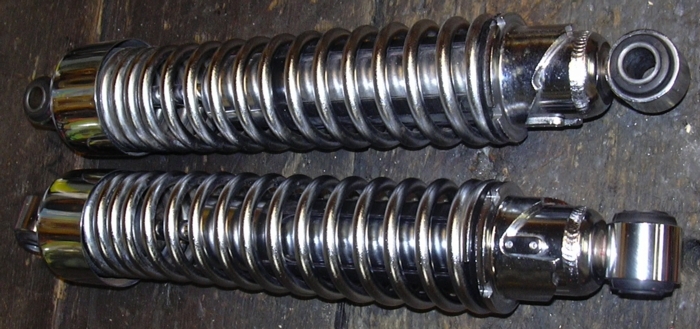
One shock has the travel limiters installed, the other one doesn't, can you tell which is which? Neither can I. The travel limiters are mostly hidden by the chrome cap and the tighter windings at the top end of the progressively wound spring.
On the right, you can see chunk of wood simulating the fully compressed shock. This is the best way to make sure your tire will not hit the fender when you drop into that pot hole at 75MPH.
This, then, is the fender clamped in place with a piece of wood being used to simulate the compressed shock while checking the tire to fender clearance. Now, having gotten this far, I've decided I don't like this fender, the way it fits, the way it looks, how thick the metal isn't and its overall quality, so I'm not going to use it. I've ordered a 16 gage 7" wide flat fender that I intend to use instead. And that will likely be the next part of the story.
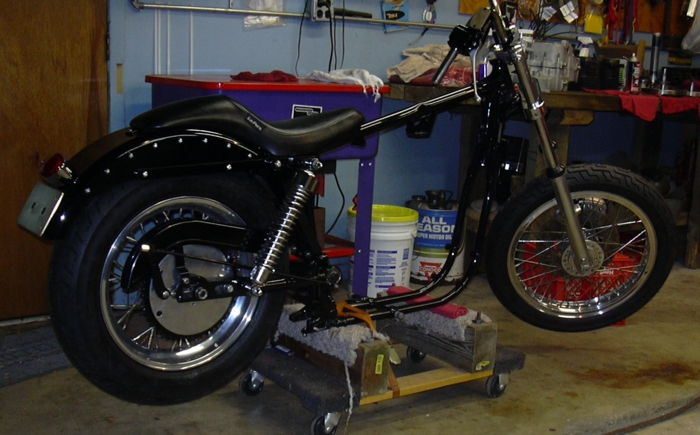
Progress to date, Friday, February 17, 2006. Well the new fender got here and I am much happier with it. This is actually the type of fender that I had planned on installing in the first place, then I changed my mind and decided to do the bob-tail fender then I changed my mind again and went back to the flat fender. Anyway I screwed around with the bob-tail fender for a day and decided I just didn't like it, the quality sucked, by that I mean the bends were not the same on the right side and left side, as long as you were looking at either side it was OK, but when you looked at it from the back you could see the fender wasn't bent right. No amount of wiggling and jiggling could fudge the line up enough to make it look straight. By the quality sucked, I also mean the metal was too damn thin. A real piece of crap...
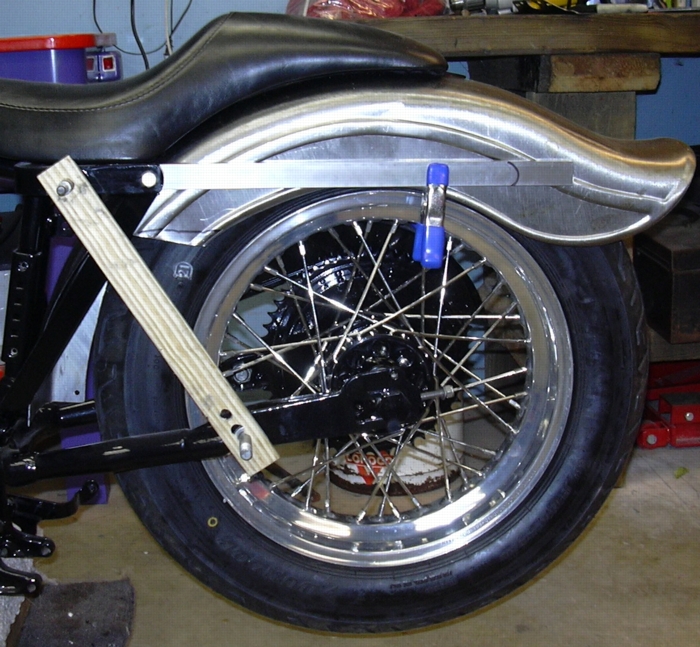
Flat fender test fit: wood strut simulates shock fully compressed. The wheel is in the worst case position: full forward. This configuration leaves ½" clearance for the tire. Also notice how nicely the curve of the seat matches the curve of the fender...

So the last couple of days have been busy, the custom fender struts have been cut to length and drilled, both at once so the holes would line up exactly. The flat fender was trimmed and fitted. Fillers for the gap between the fenders and the strut were cut from 16 gage steel. A cardboard template was made to get the shape first then the outline was transferred to the steel for cutting. All the loose bits and pieces were clamped in place before they were drilled. The left side plate was drilled first and then used as a template for drilling the right side. Everything was measured, marked, trimmed and clamped up. In the picture you can see little button head stainless steel screws attaching the fillers to the fender. These are staying and will be part of the final product. The fender and struts will be black, all the exposed fasteners will be button head stainless, I am trying to give this bike a kind of industrial look. You'll notice the compressed shock simulator is installed, the fender clearance was checked with the wheel slid forward all the way and back all the way. With the shocks set up to limit travel to 1.5" I've got about 1/2" of clearance between the fender and the tire at the extreme ends of the wheel adjustment. I like this set up, the 16 gage fender is solid, sturdy and straight. The homemade struts are very solid and sturdy, you should be able to sling a 300 pound fat mama on the back and know that she won't bend the fender or cause it to rub on the tire. Now that is what I call heavy duty.
Fender fitting in a nutshell, follow these steps:
-
Figure out how long your fully compressed shock strut is by taking the springs off and compressing it and measuring it.
-
Make a wood strut to match that length and bolt it on in place of the shocks to check your clearances.
-
If you have clearance issues, and you will, make and install travel limiters on your shocks.
-
Do your final trimming, take a little off at a time, it is a lot easier to take more off than weld some back on.
-
Do a final alignment, clamp everything in place and drill.
-
If you did everything right the fender will be centered, straight and clear the tire by ½" with the shocks fully compressed and the wheel at either end of the adjustment range.
I want to get started on the engine, but before I do the fender needs to be wrapped up completely, that includes the license plate bracket and tail light. And paint.
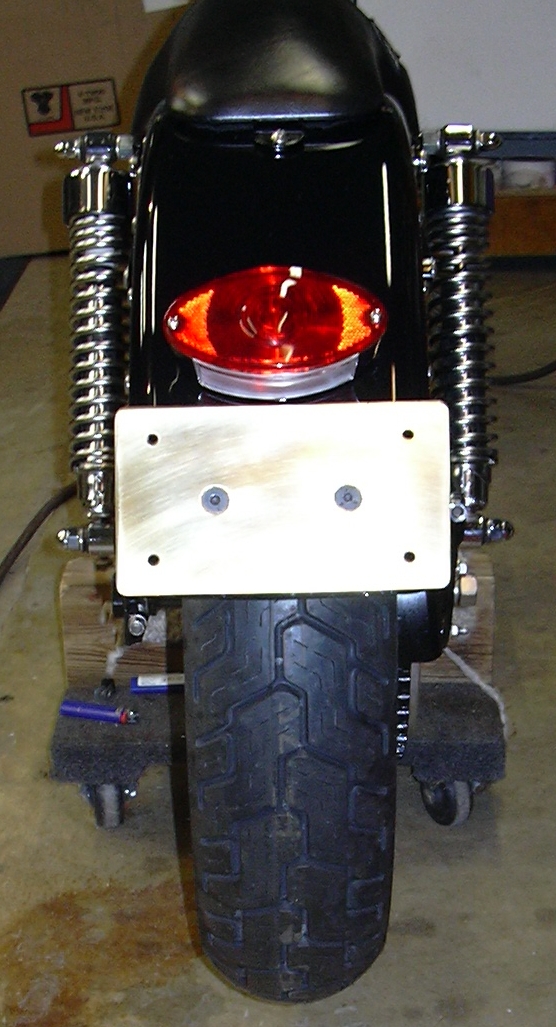
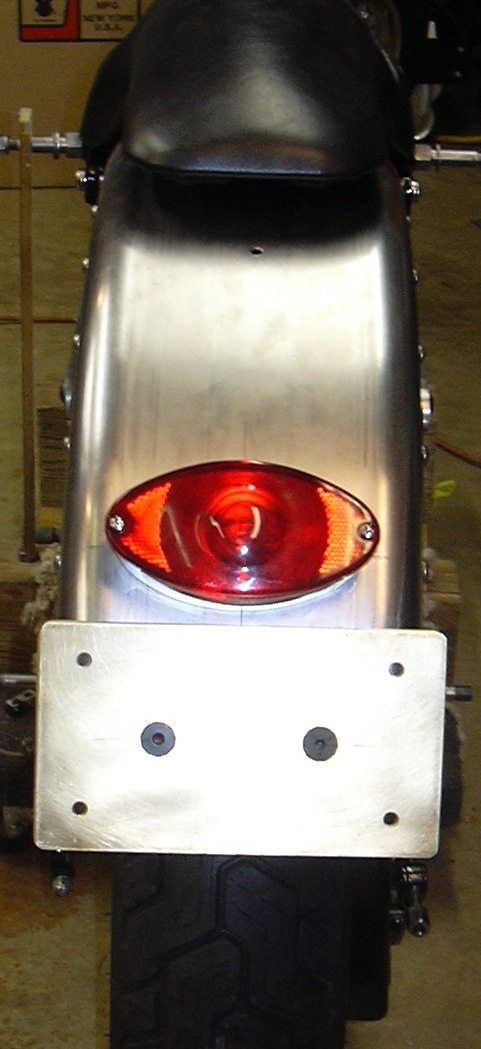
Progress to date, Tuesday, February 21, 2006. I'm finally wrapping up the rolling chassis. Below you will see a picture of the final stage of the rear fender fit-up. Basically I decided to mount the license plate bracket and tail light directly to the fender. I happened to have a chunk of ⅛" thick brass plate. I cut it to be a little bigger than the license plate, laid out a couple of holes on the fender and the mounting plate and drilled the license plate bracket and fender to match. There are a couple of standoffs on the back of the plate that you can't see in the picture, they hold the plate off of the fender. I intend to polish the brass out. I also used the brass to make a cover plate for the front brake master cylinder. I powder coated it and popped a rebuild kit in while you weren't looking. I also intend to make a timing cover out of the same brass. I think it will look sharp. The cats eye tail light mounting holes were laid out and drilled. So that's it. I got a stack of stuff to paint and powder coat and then the rear fender will go to final assembly. The fender will be painted by Maaco, they'll do it for $100 to $125 bucks. My wife dropped it off today. I can and occasionally do paint, but in this case the cost is cheaper than the hassle of doing it myself. All the other bits and pieces will be powder coated.
I also did a little work on the front end. I powder coated the handlebar risers, I have a set of bottom halves but didn't have a decent top half clamp so I had to buy one. Brand new and chrome, it will be powder coated next time I fire the oven up. At least the prep will be easy. I also dug out a set of old buckhorn bars I had laying around, they are far from perfect, but they are straight and will work just fine. These are the original HD stainless steel type. Ever notice how some older HD bars don't polish up real shiny? That's because they are stainless steel, not chrome, a lot of people don't realize that. I started getting ready for the inevitable wiring job by drilling and slotting the bars to run the wires through the inside of the bars. I hate wires hanging from the handlebars.
Progress to date, Saturday, February 25, 2006. Yesterday was an easy day for bike building, but not such a good day for Chevy trucks. The Maaco boys were done with the paint on the rear fender so I set out to pick it up and the heater core on my truck went out and filled the cabin with steamy fog. So I ended picking up a heater core too. Not that you really need a heater in Texas, but driving around with the fog on the inside of the truck is really a bitch. Allow me to digress a little here. I did eventually arrive safely home with the fender and a heater core. I decided to fix the truck. Now usually I just jump right in and reach for the manual only when I have a problem, but, heater cores can be a bitch, and I thought I'd read the manual first. I have the Haynes book on the truck and section 3 gave a rather cryptic sequence for removing the heater box and the heater core, making statements like "remove the steering wheel mounting bolts and then allow the steering wheel to drop slightly. Then remove the instrument panel mounting bolts and rotate the instrument panel up and forward as a unit." Well how about telling me how many fucking instrument panel mounting bolts and how about where the fuck are they. Nooooo, that would be too easy. Pictures? You don't need no stinking pictures. Four hours later I had most all the passenger compartment and half the engine laying in a pile on the floor in the garage and guess what, that fucking heater core ain't budged. At this point I decided to take matters into my own hands, which is what I should have done in the first place. I closed the manual and decided to take the heater box apart without removing it from the truck, 15 minutes later the old heater core was laying on the floor. So, Haynes, your manual sucks, you don't have to remove the heater box from the truck to change the damn core. Thanks to you assholes I spent six hours doing what should have taken an hour. Your manual could only have only been less helpful if it said something like "using an acetylene torch start cutting off the front clip until the heater core is exposed." Fuck you and your shitty book.
Now, moving from working on things I don't like, to things I do like. Bike assembly, and today it was easy. I'd like to think that it was easy because of all the careful fitting, measuring and pre-assembly. The fender is painted, everything else is powder coated. This step was a simple bolt together operation, all the holes had been drilled and everything was test fit before paint. The fender was bolted in with the shocks disconnected and the wheel dropped to make room to reach the nuts. I even ran two wires for the tail light. I also remembered to grind some paint off the fender at a couple of mounting bolts and at the tail light so that the tail light will be grounded. I'm going to call the rolling chassis done. And I like it so far. The engine is next and that will be chapter four.