How to Build a Sportster
(from a pile of junk)
The full sized version of pictures on this website can be viewed by right clicking on the picture and selecting "VIEW IMAGE", then use your browser back button to return to the web page.
Chapter Two
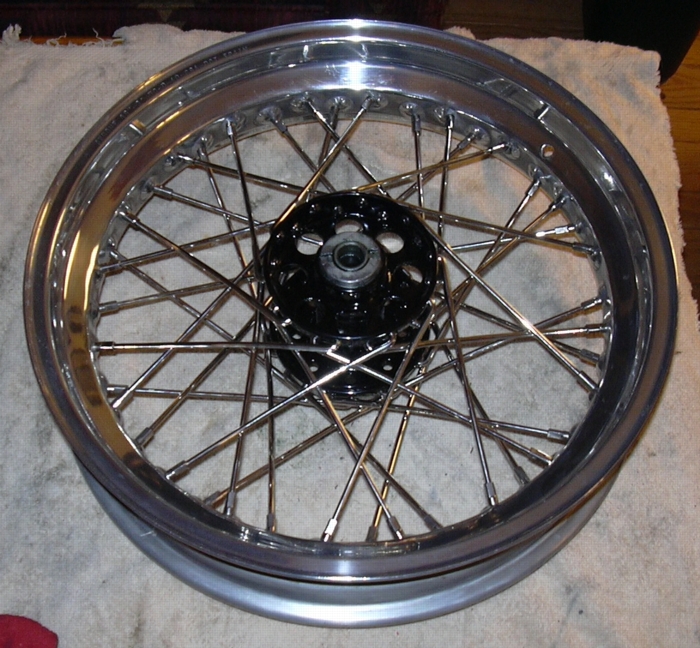
Progress to date, Saturday, December 17, 2005. Let's see where did I leave off, oh yeah the rear wheel. Buchanan's did exchange my old spoke set for another stainless steel set sized to fit my Akront rim. It gets to be kind of a long story; to shorten it up a whole bunch, a year and a half ago I bought a set of stainless steel spokes that was the wrong size, do to a misunderstanding I wasn't allowed to return the spokes at that time. But last week, Kenny Buchanan made good on that misunderstanding and let me swap out the set of spokes that wouldn't work for me with a set that does. So in the end it worked out good. When you are looking for quality spokes and people knowledgeable about wheels, Buchanan's is the only way to go.
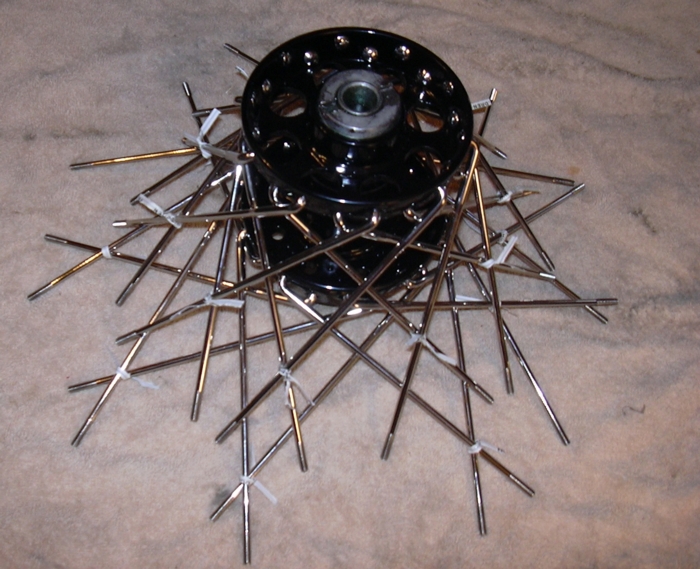
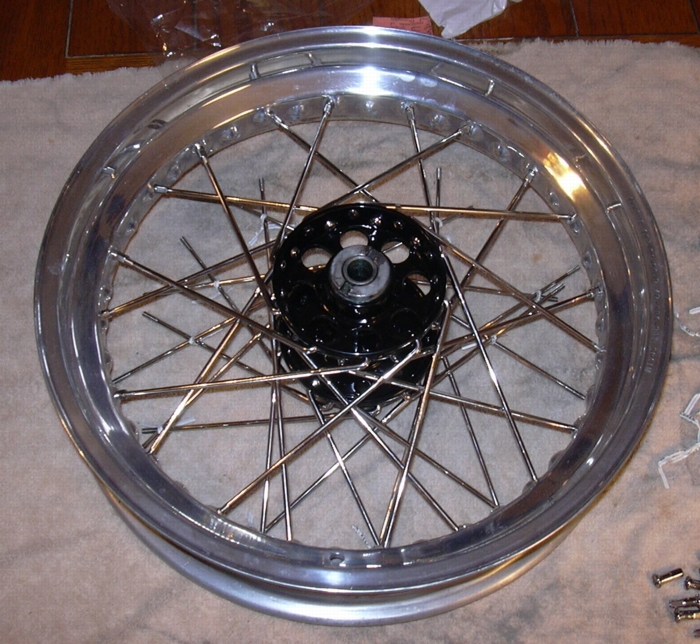
Building wheels 101 or it ain't as hard as it looks. If you have the right rim and the right hub and the right length spokes you can only put the wheel together one way, the right way. If you don't cross the right number of spokes or use the wrong holes you'll either end up with spokes that seem way to short or seem way too long. If you have the right parts you can't put it together wrong. You may waste a lot of time fooling around with different possibilities, but you physically cannot put the wheel together incorrectly. Notice the caveat in those statements, you have to know you have the right parts. There are a lot of variables in wheel building, the depth of the drop center, the angle the holes are drilled in the rim, the cross pattern you want to use. Old stock XLs are easy, the rear is a cross four pattern and there are three different drop centers. Just about any HD 16" rear wheel is drilled correctly for an XL spool hub. On drum brake rear spool hubs the inner spokes both face the same direction on disk brake rear spool hubs the inner spokes face opposite directions. And that is pretty much all you need to know. I usually put all the spokes in the hub, then point them the way they need to be pointed and cross them over however many I need to cross them over, then I put a twisty tie on them to keep them all pointed in the right direction when I drop the rim over.
There may be other ways to do this, but this is what works for me...
Once you've got it this far, you can't put it together wrong. You may waste a lot of time trying, but the spokes will fit only one way...
After the wheel is loosely assembled, put it on the axle and make sure it is centered in the frame. Centered over the hub is not the same as being centered in the frame...
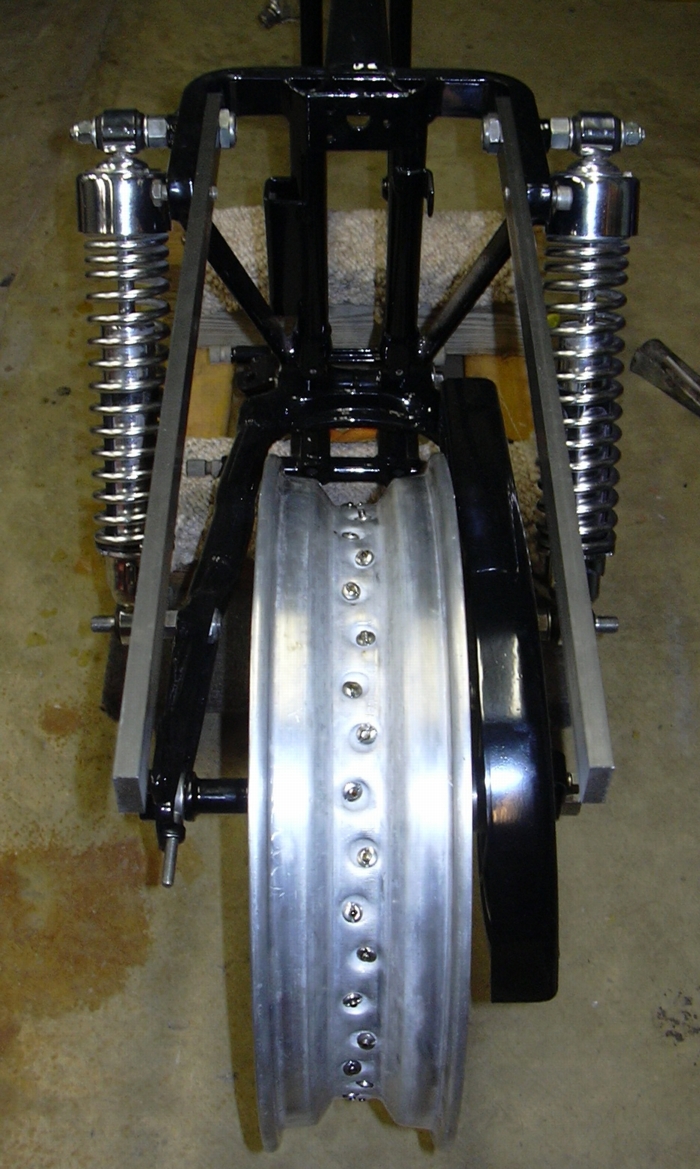
Before final truing and after the spokes are snugged it is usually a good idea to mount the wheel on the bike to ensure the wheel is centered in the frame. The HD manual gives a speck on wheel rim off set, which is fine if you are lacing the stock wheel, if you are lacing a 16 X 3.5 Akront the only way to know if it is centered on the bike is to install it and measure. Just because it is centered over the spool doesn't mean it will be centered on the bike. It is not uncommon to have to loosen all the spokes on one side while tightening all the spokes on the other to move the rim over towards one side or the other. If you have a wheel that is rubbing on the fender on one side, moving the rim over a little by the loosen one side tighten the other side might fix your problem. I noticed in this test fit that the wheel rim is dam close to the chain guard I just powder coated. I may have to trim the chain guard so it will clear the tire. I'll see after I get the tire mounted. This is an example of how you can't just change one thing on a motorcycle, the parts are all inter related and one part always seems to effect another.
Truing must be done in two steps, first you take out the up and down out of round then you take out the side to side out of round. When taking out the up and down out of round I use a dial indicator to locate the high spot on the rim, Then I loosen three spoke groups on the opposite side of the high spot and tighten three spoke groups at the high spot. after you get the rim concentric with the hub you can work on taking out the side to side wobble. If you look at the dial indicator, the range ticks are .010" apart, I can usually true the wheel up to within .010" in both directions. I do the final spoke torque with the dial indicator in place, you can actually see the needle move as you tighten a spoke. All you have to do is keep the needle in the center of the range ticks, piece of cake. The final step is to grind off the ends of any spoke that protrudes past the end of the nipple, otherwise those protruding ends will poke a hole in your inner tube. (Since this was originally written I've also made it my standard practice to use a spoke torque wrench.)
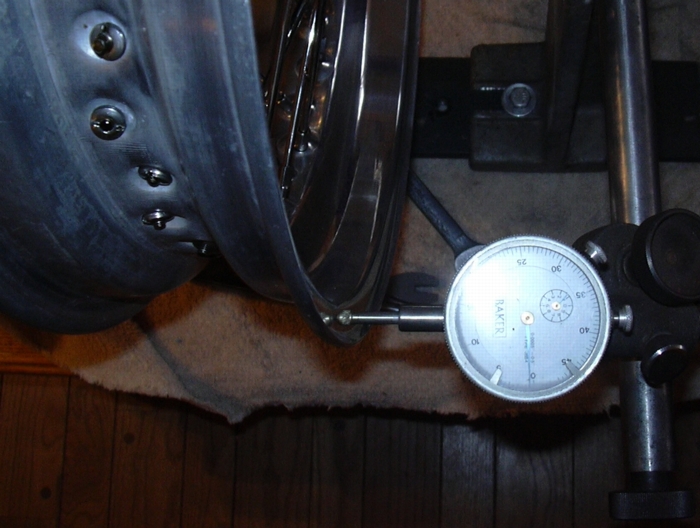
A dial indicator is not necessary, I just like to use it...
Ready for a tire...
So that is it for now, the rear wheel is laced, I'll be ordering a new tire, after Christmas, I have to give my credit card a rest.
Progress to date, Saturday, January 7, 2006. Dumpster diving 101, oh wait, I mean searching through my crates of carefully organized pristine cherry used parts. I ordered some tires, spokes for the front wheel, rear brakes, front wheel bearings and a couple of other little things I am going to need. While waiting for this stuff to show up I thought I do little reconnoitering of my crates to round-up everything I had that I thought I would need. It is about time to figure out whether or not I actually have enough bits and pieces to put this thing together.
I was pleasantly surprised to find out I wasn't in too bad of shape, despite a big hole to fill in as far as the primary and kick start are concerned. I found an XLCH battery tray, missing the mounting brackets and rusty, but nothing sandblasting, powder coating and a little fabrication couldn't fix. I found another complete pawl carrier for the trans, I have two and can use whichever one looks better. I found another brake pedal, black steel and not bent. Now I don't have to powder coat the chrome one I have. I found another trans main shaft and clutch gear. I also found a set of connecting rods with crankpin and bearings packed in grease that looks usable as is, pending final inspection. I also sorted through my extra jugs and heads. I have six jugs and 8 heads. Two jugs and two heads are early 1000cc, generally regarded as weaker than the later ones. I won't be using them. Two of the other heads are 900cc heads, I won't be using them either. So that leaves me with my choice of the remaining two sets. I also found a headlight eyebrow and a rear brake lever. I looked for and didn't find a good headlight. What I did find was two crates full of rusty dented old headlights, I actually threw most of them away, and I had been hauling them around for 20 years. I did keep two old antique car headlights, one dated back to 1922 or so. I also found a gear shift lever, some foot pegs and a left foot peg mount.
Just before Christmas I bought a set of cams, lifters and lifter bodies from a guy on the XL List swap page.
I also was searching eBay for an old CV carb to use on this project. I happened to come a cross a picture of a carb a guy was selling and in the background of the picture was an XLCH oil tank. I emailed the guy and told him that I didn't want his carb but if he still had that CH oil tank, I'd take it off his hands. So he sold it to me for 20 bucks. I had an XLH oil tank and could have built the bike as either the electric XLH version or the kicker only XLCH version. I had the starter gear housing and bendix and the XLH oil tank, but I like the simpler XLCH set-up better. I just didn't have an oil tank... until now. So this bike will go back together as an XLCH, which is nice since the numbers on the frame tell me that the frame, at least, used to be an XLCH.
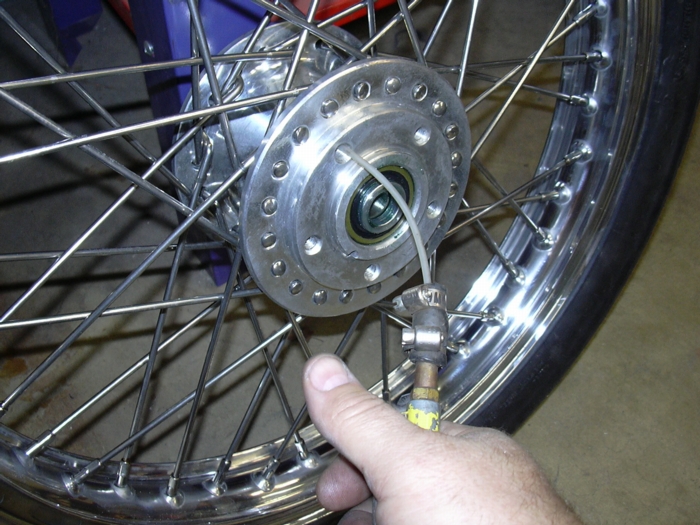
I also commenced to starting to polish the front rim. I found that that is going to be a real pain in the ass. The anodized surface doesn't polish out like I thought it would. The anodizing has been sanded off the outer edge of the rim and it polished out great, the inner part hasn't been sanded off and it doesn't polish worth a shit. Right now I'm not sure what I'm going to do. To make matters worse, I'm not 100% sure that that rim will lace up to the hub I have and I don't want to bust my balls spending hours on a rim that might not work anyway. Which leads me to believe that I am going to have to test assemble it to make sure it will work and then take it back apart to polish it out assuming I can some how figure out a way to sand the anodizing off the inner surfaces of the rim without killing myself.
Progress to date, Friday, January 13, 2006. Time to get caught up. The tires, inner tubes, rim strips and rear brakes came a few days ago. I was able to get the rear wheel mounted and rear wheel brake installed. I put tires on the old fashioned way, with tire irons and muscle. Back when I was working my way through college as a motorcycle mechanic, our shop used to charge seven bucks for changing a tire on a Jap bike and ten bucks for a Harley. One mechanic always had to work on Saturday, and Saturday was tire buying day for some reason. The guy working Saturday would change eight to ten tires, using tire irons and taking the wheel off and putting the wheel back on. After a day of doing that every muscle in my body would be killing me. Prying a big (in those days) old hard 16 X 5.1 tire off the rim was like wrestling with an octopus. We worked on commission so after busting a nut all day the mechanic might take home 40 bucks. Anyway, I still change tires with tire irons. I use six inch lengths of 5/8" nylon hose split down the side as rim protectors and if I am careful I can get a tire off and on with out fucking up an alloy rim.
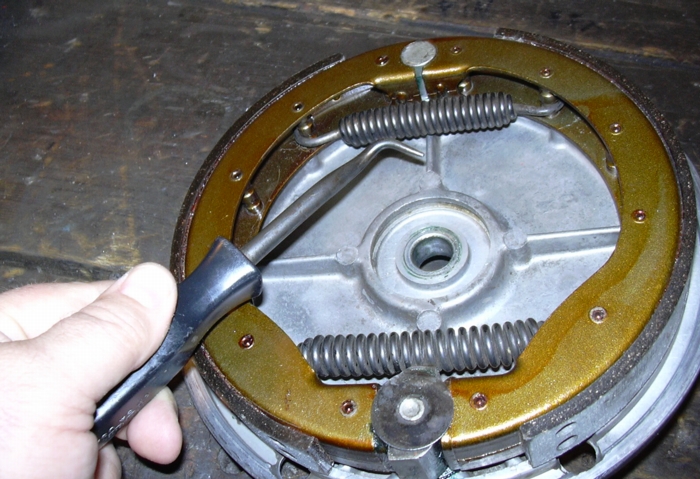
In the next two photos you see brake shoes installed and the bolts holding the drum to the hub installed. These photos are here for a couple of reasons. If you'll notice, in the first picture, you can see detents in the posts the brake springs are hooked around, the springs should be set in the detent closest to the backing plate. Why? Because if you don't set them there they might rub on the bolts that hold the drum on the hub. These particular drum bolts are aftermarket, and, as you can see in the photo, they are a little longer than they need to be, which is the reason they might rub on the springs if you set the spring in the wrong detent. For some reason, which I haven't been able to figure out, HD has two different lengths of these bolts, I would think that the shorter ones would work in all cases. Just be aware that the clearance between the bolts and the springs is an issue.
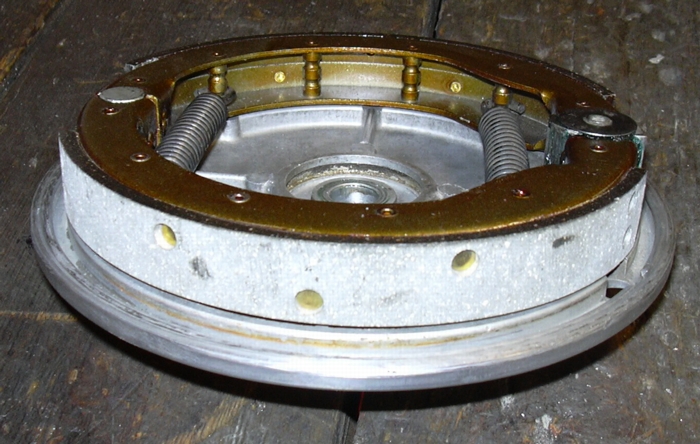
Note which detent on the binding posts the springs get installed in, there is a reason for using the outer one...
There are different lengths of bolts, if you use bolts that are too long they will rub. Get a hack saw and cut them off if you must. The bolts are supposed to be a tight fit in the drum and hub, if not the drum will work loose. I've see drums with hairline cracks emanating from the bolt holes. Inspect this area carefully...
As far as installing the brake shoes is concerned, I like to hold the shoes together and lay the spring over the posts closest to the side where the actuating cam goes. These posts are a little farther apart than the posts on the other end of the brake, hence, they stretch the spring a bit farther, you can then unfold, if you will, the brake shoes over the actuating cam. I was trying to take picture of me doing that so y'all could see what I meant, but you can't hold the camera, hold the brakes and fight the spring all at once. Anyway, that gets you one spring, the harder one to install, installed. For the remaining spring I like to use a tool called a hooked nose booger picker. Actually, it is called a cotter pin remover, God only knows why, I've owned that tool for thirty years (45 Years now)and have taken out maybe one cotter pin, almost maiming myself in the process, with it. It is a damn handy little tool for all kinds of stuff, it just sucks when you try to use it for taking out cotter pins. In this case it is a great tool for hooking that second spring over the post, so today, it is a brake spring installing tool.
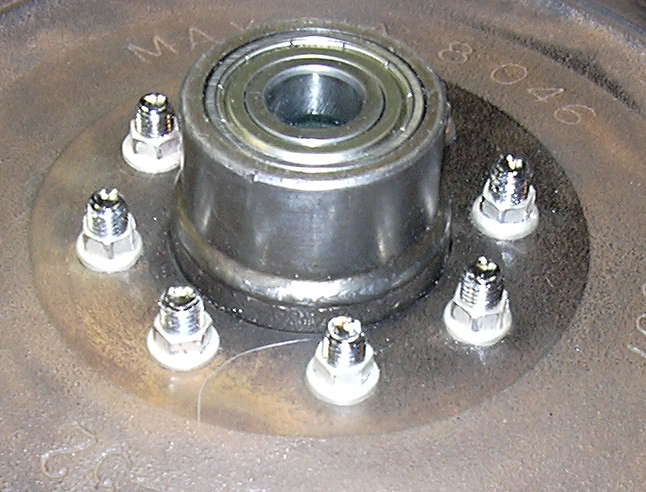
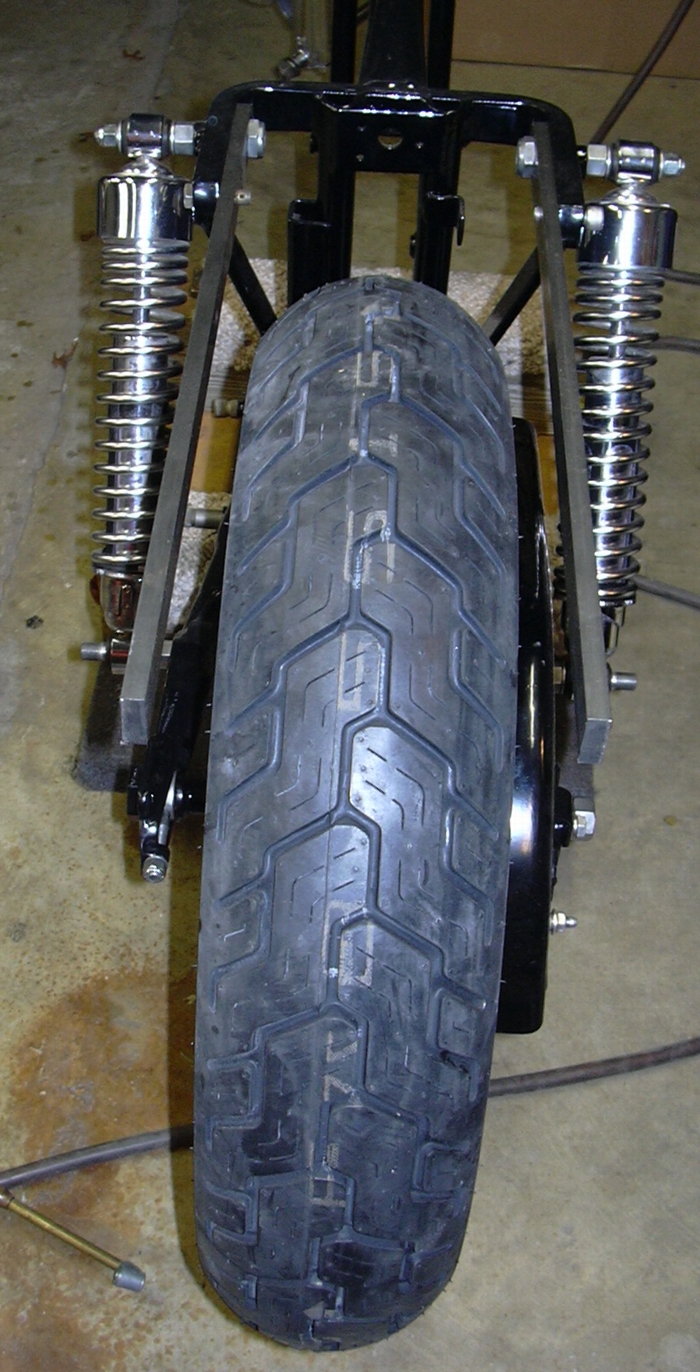
With the brake drum bolted to the hub, the tire mounted and the brake shoes installed the next step is to test fit the wheel. And I am here to tell you that a wise man will test fit the axle before he muscle the wheel up into place. Reason being that the powder coat build up on the slot the axle mounts in prevents the flats on the axle from entering the slot. Oh sure you can beat the axle in with a hammer but why? When sixty seconds with a file will remove the powder coat from the swing arm so the axle is a nice easy fit.
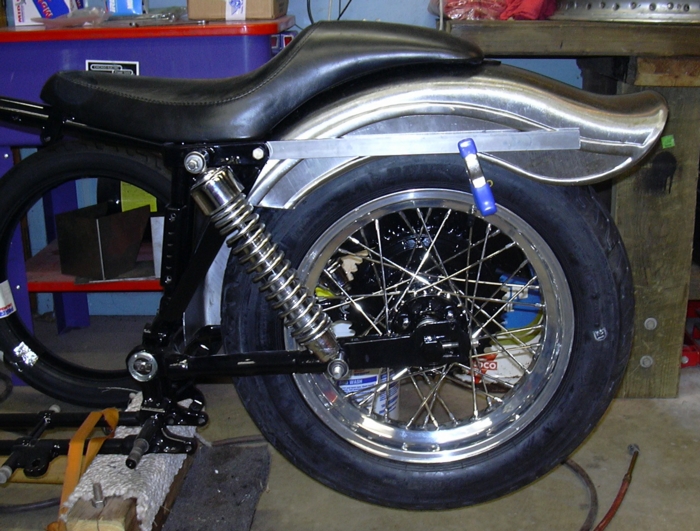
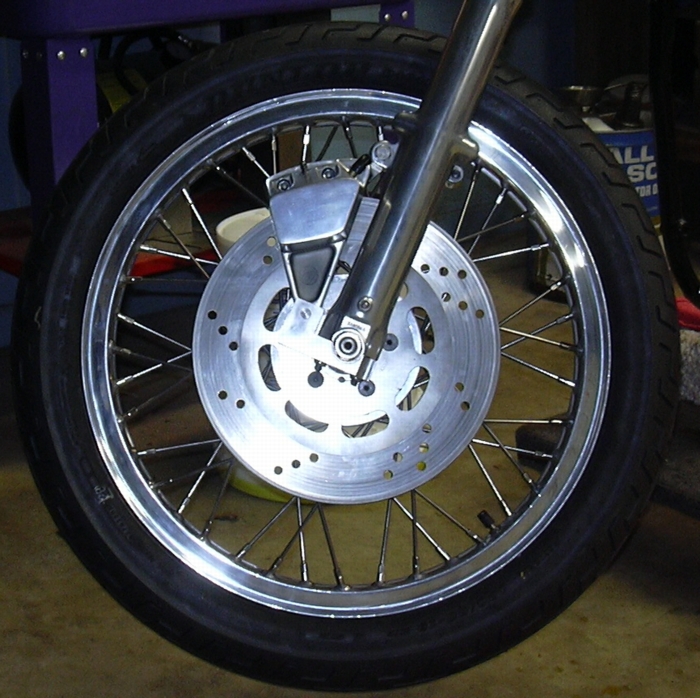
Now that the axle is a nice slip fit, on goes the wheel. Notice that the wheel is nicely aligned with the center of the frame. I have about 1/2" clearance on either side of the tire for my hand made fender struts, the tire also clears my chain guard by about 3/32". If the wheel wasn't trued good enough it would rub on the chain guard, as it is there is no wobble when the wheel is rotated, thanks to the .010" truing job.
And now first test fit up of the fender. I had to trim a bunch off to clear the diagonal brace on the left side. Not all XL have these braces Harley started adding them in about 1974 to stiffen the upper rear shock mount area. Some guys say you don't need them and actually cut them off. Personally, I am inclined to leave them in place. I expect it is going to take a day of fiddling around to make the fender fit just right. The hand made struts will have to be shortened, provisions made for tail light wires, mounting holes drilled, spacers made etc.
Progress to date, Saturday, January 14, 2006. Today is a good news bad news kind of day. As you may recall, I needed to strip the anodizing and polish my front rim. I rooted around on the Internet and found a couple of sources that recommend Easy-Off oven cleaner as a way to remove anodizing. The good news is a 20 minute soaking with Easy-Off burned through the anodizing without fucking up the aluminum underneath and polishing out the wheel was a snap. More good news, the mystery rim laced right up to the dual disc brake hub. I had test fit spokes on one side of the rim, they looked like they would fit just fine, so I proceeded with the Easy-Off treatment and polishing. I really didn't want to work on the front wheel right now, I wanted to finish fitting the rear fender, but, I have 30 days to return the spokes if they didn't fit, so I needed to get rolling (no pun intended) on the front wheel so I wouldn't get stuck with a 100 dollar set of spokes that wouldn't work. A word of caution on Easy-Off, I tried it on a small part of the rim before I committed to soaking down the whole thing. I had a bad experience with Easy-Off years ago. I had heard of people using it as a degreaser. I had a greasy old pair of Shovelhead heads that needed degreasing so I soaked them for a couple of hours in Easy-Off, true to advanced billing, the Easy-Off ate right through the crud. I hosed the heads off and blow dried them, the next day the heads had fine white hairs growing out of the pores in the aluminum, I assumed Some Easy-Off must have remained trapped in the pours. So I washed the heads down with very hot soapy water and blow dried them again. Next day, same thing, the heads were alive with fuzz. I soaked those heads in soapy water overnight and washed them again. Blow dried as usual, next day, same thing, they were growing fuzz like a Chia pet. Not desirable for a motorcycle. I think the Easy-Off altered the aluminum on a molecular level and that I had created a new alloy, properties completely unknown. That shit ought to have a warning on the label that says "DO NOT USE ON ALUMINUM." Since then, I haven't, until yesterday. So far the wheel rim remains fuzzless. The Easy off was a little scary while it was working, it bubbled up and turned black. I rinsed it off and lightly sanded the black oxidized aluminum with 400 grit, and, like I said it polished out great.

Before polishing...
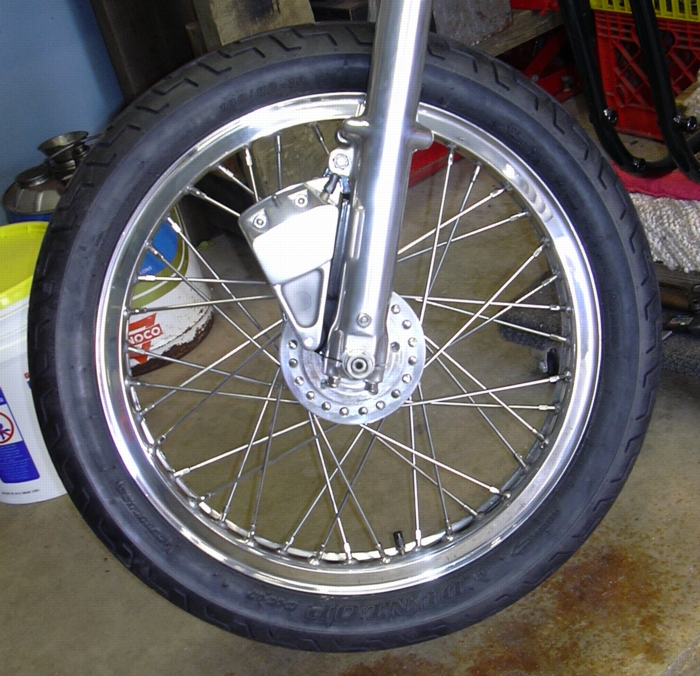
After polishing...
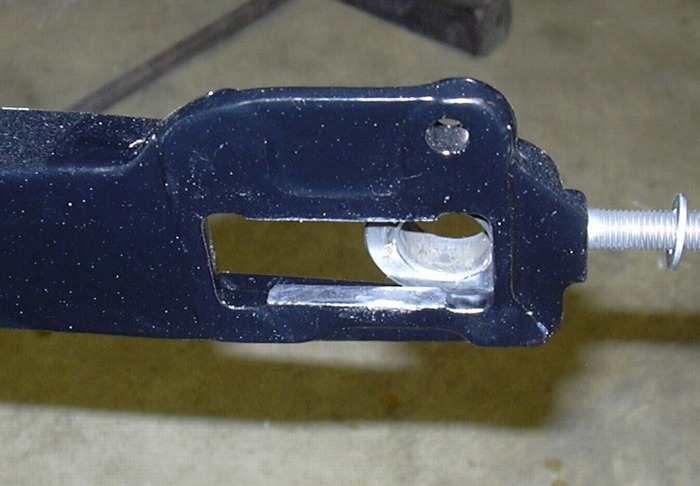
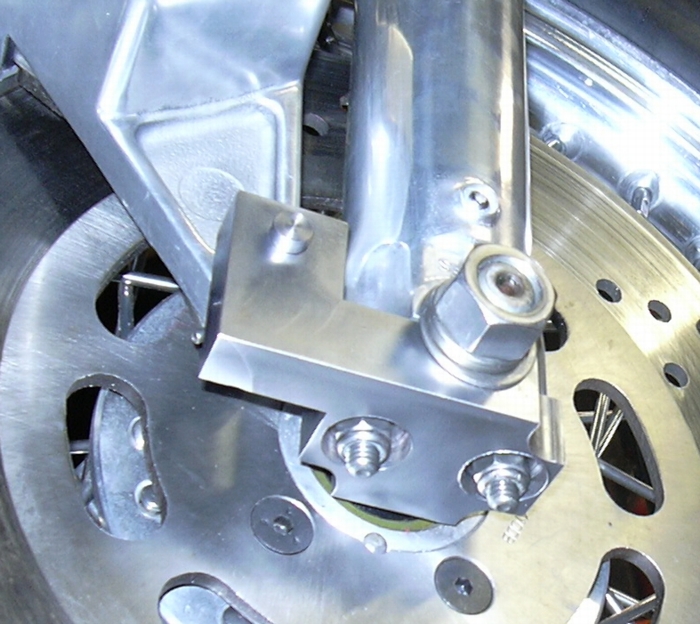
So, in this order, strip anodizing polish rim, lace wheel, true wheel and mount tire. All is well and good. Now for the bad news, test fit wheel, found that the dual disk front hub ain't going to work with the pie slice caliper, least not without some welding and machining. I could completely disassemble the wheel I just built yesterday and round up the correct wheel hub or I could round up dual disk fork legs and a dual disc caliper or I can cut weld and fabricate a new caliper anchor that will clear the disk and mounting bolts. Hopefully the latter will work and this will be an example of how cleverness, a tig welder and a mill can make up for poor planning. You have to expect these little problems when putting together two things that were never meant to be put together and, in fact, have never been put together. It is hard to tell from the picture but the lower caliper anchor (little black thing) sits right where the disk is supposed to go. I think I'm going to be able to cut it off, move it outboard a bit, weld it back together and make a shorter bushing for the lower mount and weld the bushing to the re-manufactured anchor. Wish me luck.
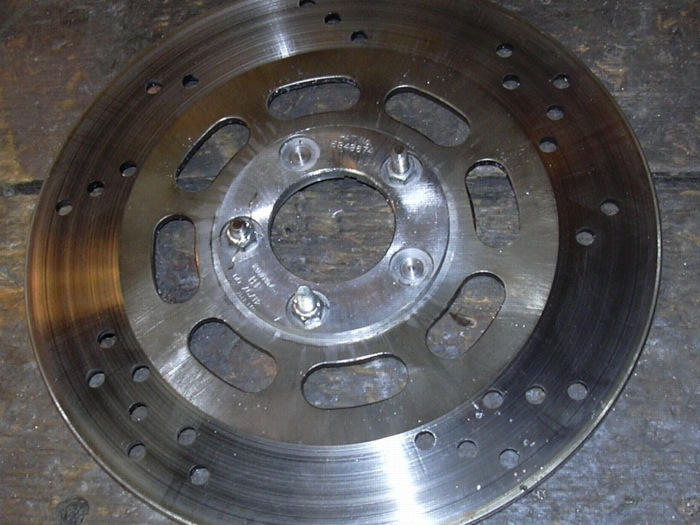
Progress to date, Sunday, January 29, 2006. Well I know a lot more about HD brake disks than I used to... or care to. I would have thought that it would be a simple matter of just buying an 11.5 inch disk and bolting it on the wheel. Wrong. It seems as though the dual 10 inch disk set up had disks with 2.4 inch holes in the middle all the HD 11.5 inch disks have either 2 inch or 2.25 inch hole in the middle. Further complicating my choices, I happened to have a set of dual disk brake fork legs laying around, but none of the other parts, like the disks or the calipers. So I could have opted to use the dual disc set-up, but then I would have had to round up calipers and disks adding substantial cost to this project. Not an acceptable route to take when the goal was to build this thing out of spare parts laying around my garage. Even though the dual disk set-up would have been more expensive, a lot of people would think it is the better, more trick way to go. I've driven bikes with the old dual disk set-up and they don't work nearly as good as you'd think they should. So without a doubt in my mind the best way to go would be to modify the parts on hand so that the single disk caliper and fork legs would work on a wheel with the dual disk brake hub. In any case I needed to buy at least one brake disc. So I bought a new disk for my 93 XL, took the used, but in good shape disk off the 93 and modified it to use on this project. The problem being that the disk had the wrong size hole in the middle for the dual disk hub. What to do? Well I had another junk disk laying around. I cut it down so that it was about 5 inches in diameter, the idea being to use it as an arbor to which I could bolt the project disk. Then I could chuck the arbor with the project disk bolted to it into my lathe and turn the hole in the center out to the right size to fit the dual disk hub. In the picture below you should notice a couple of things. The sacrificial arbor disk had 3/8" mounting holes the project disk has 5/16" mounting holes. Therefore, just bolting the arbor to the project disk would have resulted in the two pieces not being concentric with one another and the bore job on the center hole would have resulted in a hole that wasn't in the center of the disk. I made two stepped bushings, one end 3/8" for the arbor the other end 5/16" for the project disk. The bushings were light press fit into the mounting holes for both pieces, they kept the disks concentric with one another for machining operations. Kind of a pain in the ass, but, nonetheless, the best way I could figure out to solve my problem of enlarging center hole and actually getting it to end up in the center of the disk.
This shows the sacrificial arbor with alignment dowels bolted to the project disk, this was the best way could figure out to make sure the hole stayed concentric to the disk when I bored it out.
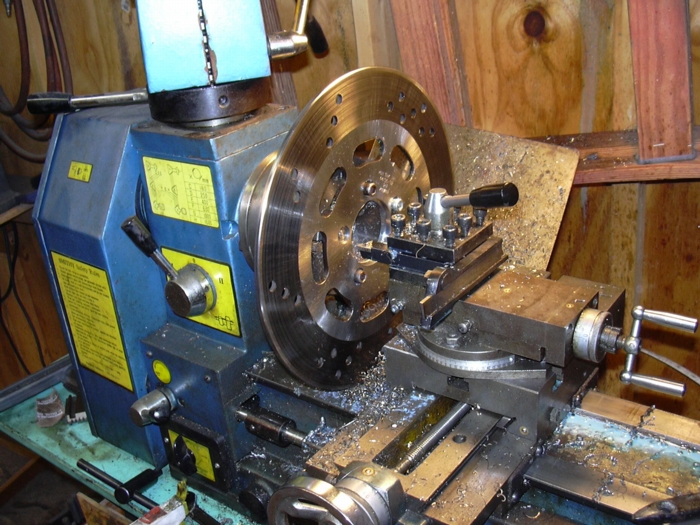
This is the project disk bolted to the arbor disk and chucked up in my lathe. Once the stepped alignment bushings were made, turning the center hole out to the 2.4 inch diameter ended up being the easy part.
As a matter of standard practice, I almost always run a tap through most threaded bolt holes to clean out whatever crud may be lining the hole. Then I use a specially rigged up blow gun to blow the chips and crud out of the hole. I find that a standard blow gun nozzle just blows the crud deeper into the hole. I use this one with a little tube clamped on it to reach into the bottom of the hole and actually blow the crud out. By sticking the small tube into the bottom of the hole, the air stream is moving the right direction, out instead of in, to clean the hole. A big deal? Perhaps not, but a small precaution to take to avoid stripped threads and ensure easy assembly.
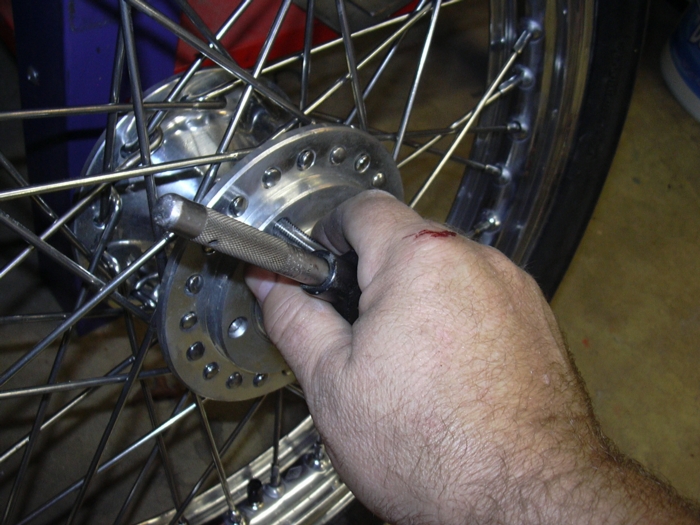
Now that I have the disk bolted to the wheel the next step will be building the new caliper mounting brackets!!! Oh joy...
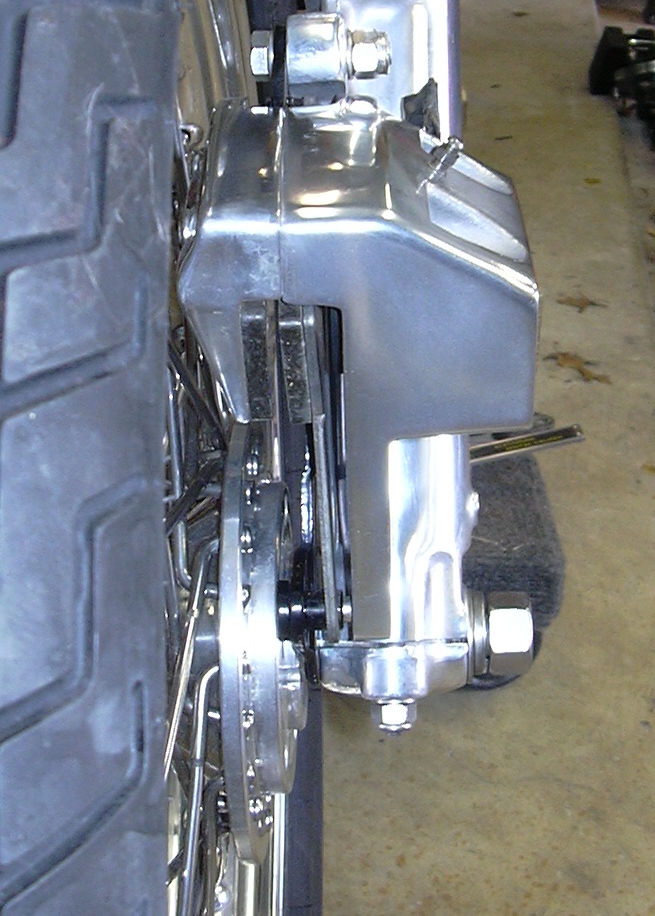
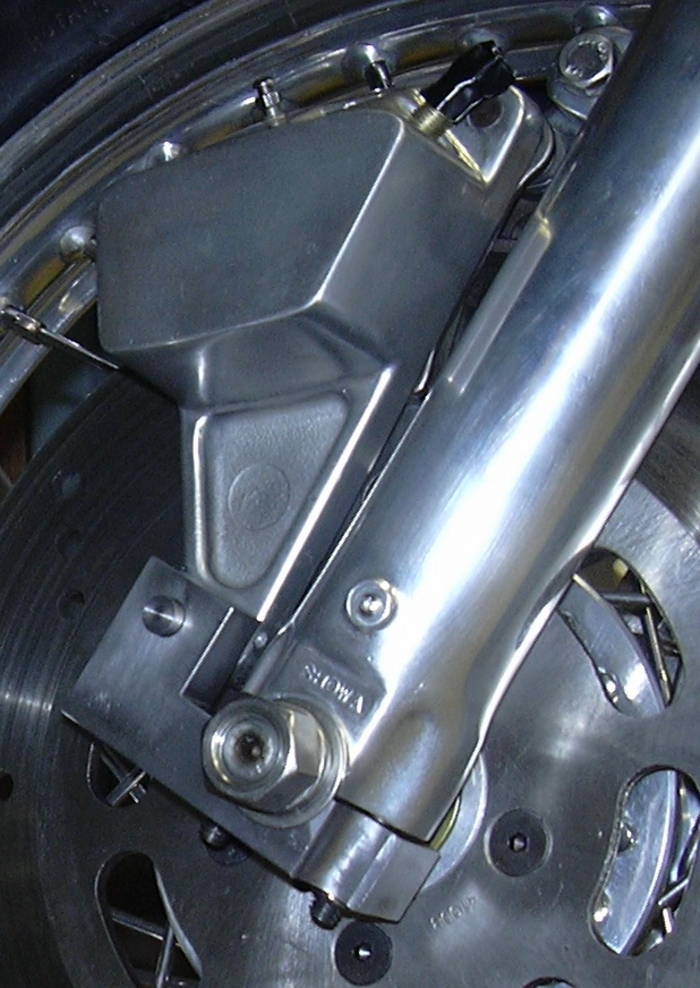
Progress to date, Sunday, February 5, 2006. The battle with the incompatible front wheel/front brake is finally over and I won. I was originally thinking that I'd redesign the steel bar HD uses to hold the brake caliper on, ultimately, after staring at the wheel for about three hours while drinking gin, I decided to shit can the steel bar and redesign the axle clamp to incorporate the caliper lower anchor point. I decided to use steel, rather than aluminum, because, of course, it would be much stronger. It also made the machining much tougher, at least for a neophyte machinist like me. In the end I really like the final product, if I do say so myself. It will, of course, be powder coated black next time I fire up the oven. So here's the final brake install all done, except for the powder.
And, with that, I think I'll make this the end of chapter two. So chapter three will begin with fitting the rear fender, something I wanted to do 2 months ago until I was so rudely interrupted by the pesky front wheel.